How Long Does Henna Take to Dry? Complete Guide to Perfect Results
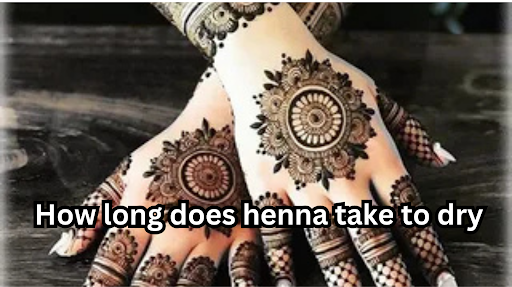
You’ve just finished applying a beautiful, intricate henna design. The lines are perfect, the pattern is stunning, and you can’t wait to see that rich, reddish-brown stain develop. But now comes the hardest part: the wait.
How long do you really have to sit still? If you scrape it off too soon, the stain will be faint and disappointing. Wait too long, and it might just flake off without transferring its color deeply. The secret to a perfect henna stain doesn’t just lie in the application; it’s deeply rooted in the drying process.
So, how long does henna take to dry? The short answer is: it’s complicated. But don’t worry—this complete guide will walk you through everything you need to know, from the science of drying to pro tips for that coveted dark, long-lasting stain.
The Science Behind the Stain: Why Drying Time Matters
To understand drying, we must first understand how henna works. Henna paste is made from the crushed leaves of the Lawsonia inermis plant, mixed with liquids like lemon juice and essential oils. The active dye molecule, lawsone, binds to the keratin in your skin’s top layers.
The drying process is crucial because it’s not just about water evaporating. As the paste dries, the lawsone is slowly released from the plant matter and begins its journey into the skin. The goal is to keep the paste in contact with your skin for long enough to allow this dye transfer to happen effectively.
The Stages of Henna Drying: A Timeline
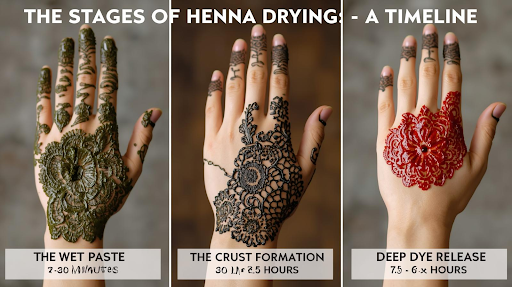
The drying process isn’t a single event; it’s a journey through several distinct stages. Understanding these will help you pinpoint the perfect moment to remove the paste.
Stage 1: The Wet Paste (0 – 30 Minutes)
Immediately after application, the paste is wet, glossy, and dark green. During this stage, it’s extremely vulnerable to smudging. The lawsone is suspended in the liquid and hasn’t yet begun to deeply stain.
- What to do: ABSOLUTELY DO NOT TOUCH IT. Keep the limb still and in a comfortable position.
Stage 2: The Crust Formation (30 mins – 2.5 Hours)
This is the critical drying phase. You’ll see the glossy shine disappear, and the paste will turn a matte, dusty greenish-brown. A thin, dry crust forms on top. However, the paste underneath is often still moist. This is where most people make a mistake—assuming it’s fully dry.
- The “Tickle Test”: Gently tickle your skin next to the design (not on it!). If you don’t feel the sensation of wet paste squishing, the top layer is set.
Stage 3: The Deep Dye Release (2.5 – 6+ Hours)
Once the crust has formed, the magic happens underneath. The heat from your body helps the remaining moisture and lawsone continue to penetrate the skin. The longer you can leave the dried paste on (as a “wrap”), the darker and longer-lasting your stain will be.
- Pro Tip: Many artists recommend wrapping the design lightly with a breathable material like medical tape or gauze after it’s dry to the touch. This protects it from accidentally flaking off and keeps the heat in, facilitating deeper dye release.
Also Read: How Often to Change Cabin Air Filter
Factors That Drastically Affect Drying Time
Wondering why your friend’s henna dried in an hour but yours is still tacky after three? Several variables are at play:
| Factor | Effect on Drying Time | Pro Tip for Control |
| Paste Consistency | A thin, watery paste dries faster but may crack and provide a weaker stain. A thick, toothpaste-like consistency takes longer to dry but holds more dye. | Aim for a smooth, thick consistency that holds its line. |
| Climate & Humidity | This is a huge factor. Dry, hot climates accelerate drying. Humid, cool environments can double or triple the drying time. | In humidity, use a fan on a cool setting or a hair dryer on cool to circulate air. |
| Body Placement | Areas with more blood flow and heat (palms, soles, fingertips) dry faster. Bony areas with less heat (ankles, wrists) dry slower. | Apply henna to warmer areas first to give them more drying time. |
| The Sugar-Lemon Juice Ratio | Lemon juice is acidic, which helps release lawsone, but sugar is added to make the paste sticky and pliable. More sugar can slow drying slightly but prevents cracking. | A good balance is key. Recipes with more sugar require more patience but often result in a better crust. |
The Ultimate Goal: How to Get the Darkest Stain
The question “how long does henna take to dry” is really a proxy for “how long until I get a dark stain?” Drying is a means to an end. Here’s how to maximize your results:
- Leave the Crust On: This cannot be overstated. The dried paste is a concentrated layer of dye. Don’t pick at it! Leave it on for as long as possible—anywhere from 6 to 12 hours is ideal. Overnight is fantastic if you can manage it.
- Seal with a Sugar-Lemon Solution: After the paste is dry to the touch, mix a little lemon juice with sugar and gently dab it over the design. This re-activates the top layer slightly without washing the dye away, helps the paste adhere, and prevents cracking.
- Keep it Warm: Wear loose, comfortable clothing that covers the design to trap body heat. The warmth helps the dye continue to release.
- Avoid Water: Water is the enemy of the developing stain. It can stop the dye-release process in its tracks.
The Grand Finale: Removing the Henna Paste
When you’re finally ready to remove the paste, don’t use water! Simply flake it off with your fingers or a dull tool like a butter knife or credit card. You can rub it off with a little cooking oil (like olive or coconut oil), which helps lift the paste and moisturizes the skin.
The stain underneath will be a bright orange. This is normal! Over the next 24-48 hours, it will oxidize and darken to that classic deep reddish-brown.
Conclusion: Patience is the True Secret
So, how long does henna take to dry? The surface may be dry in 1-2 hours, but the real dye-release process needs a minimum of 4-6 hours to work its magic. The ultimate key to a dark, lasting henna stain isn’t a secret ingredient—it’s patience.
Respecting the drying and dye-release stages is what separates a fleeting orange mark from a stunning, weeks-long work of art. Now that you’re armed with this knowledge, you’re ready to create and enjoy henna designs with confidence.
Read More Like This: How to Clean Night Guard
Frequently Asked Questions (FAQs)
Can I use a hair dryer in a warm setting to speed up the henna drying process?
It’s not recommended. While air circulation helps, direct heat from a hair dryer on a warm or hot setting can actually “cook” the henna paste. This can degrade the lawsone dye molecules and result in a much weaker stain. Always use the cool air setting if you use a hair dryer or fan to gently accelerate drying, especially in humid conditions.
My dried henna paste is cracking. Did I do something wrong, and will it ruin my stain?
Some cracking is normal, especially with a thicker paste application. However, excessive cracking can expose underlying skin to air too early, potentially creating a slightly uneven stain. To prevent this, ensure your paste has a good balance of sugar (for elasticity). After the paste is dry to the touch, you can lightly seal it with a sugar-lemon solution to keep it flexible and adhered to your skin.
The stain under my paste was bright orange when I removed it. Is that normal?
Absolutely! This is a completely normal part of the process. The initial orange stain will oxidize upon contact with the air over the next 24-48 hours. This oxidation process is what deepens the color to the classic dark reddish-brown stain. Avoid washing the area with soap for the first 24 hours to allow the color to develop fully.
How does body placement affect how long I need to leave the henna on?
Areas with thicker skin and more heat (like your palms and the soles of your feet) absorb dye more efficiently and often produce the darkest stains. These areas can typically handle a shorter drying and dye-release time (though longer is still better!). Cooler, bony areas like ankles and wrists have thinner skin and less blood flow, so the paste may take longer to dry and might require a longer wear time to achieve a dark stain.
What’s the best way to remove the dried paste without water?
The best method is to simply flake it off with your fingers or a dull tool. To help lift it and moisturize the skin at the same time, you can rub the area with a natural oil like coconut oil, olive oil, or sesame oil. The oil will help dissolve the paste residue, leaving you with a clean, orange stain ready to oxidize. Using water at this stage can prematurely stop the oxidation process and lighten the final color


